Sunday, December 10, 2017

The Docker way...

What is Docker Container?


Docker is an open-source engine that automates the deployment of any application as a lightweight, portable, self-sufficient container that will run virtually anywhere.

Docker containers can encapsulate any payload, and will run consistently on and between virtually any server. The same container that a developer buildsand tests on a laptop will run at scale, in production*, on VMs, bare-metal servers, OpenStack clusters, public instances, or combinations of the above.


[Source: As in package description, Vendor: Fedora Project]


Difference between Docker and VM [Pic source, Internet ]


Let's try out few basic stuff using Docker (Tested on a CentOS-6x based VM);


1. Install epel repo to get Docker-io


[root@docker-vm ~]# yum install epel-release -y


2. Install docker-io package and start the service;


[root@docker-vm ~]# yum install docker-io -y


[root@docker-vm ~]# service docker start
Starting cgconfig service:           [  OK  ]
Starting docker:                        [  OK  ]

3. List if we have any Docker image avaialble locally;

[root@docker-vm ~]# docker images
REPOSITORY          TAG                 IMAGE ID            CREATED             VIRTUAL SIZE


4. Since images are not available locally, I would pull a CentOS-6.9 image and try out few things;


Pulling a specific Centos docker image version;

[root@docker-vm ~]# docker pull centos:6.9
6.9: Pulling from centos

055b9989266a: Pull complete

f1070d829305: Pull complete
e071bce628ba: Pull complete
Digest: sha256:e7bdc458659b6e644ae85694f2baaf3727c06ad82186fca80f4e3a8e88907cc3
Status: Downloaded newer image for centos:6.9

5. List images once more;

[root@docker-vm ~]# docker images

REPOSITORY          TAG                 IMAGE ID            CREATED             VIRTUAL SIZE8.
centos              6.9                 e071bce628ba        5 weeks ago         194.7 MB

6. Now run our first container [docker run -it stands for docker run --interactive --tty, do a man docker-run for options] ;


[root@docker-vm ~]# docker run -it e071bce628ba /bin/bash
[root@bd93eb2b1ccf /]#

["e071bce628ba" is the IMAGE ID]


7. Now, within our container, let's install few packages [eg. iproute, httpd, nmap etc.];

[root@bd93eb2b1ccf /]# yum install iproute nmap httpd -y

8. Start HTTPD ;
[root@bd93eb2b1ccf /]# service httpd start
Starting httpd: httpd: Could not reliably determine the server's fully qualified domain name, using 172.17.0.1 for ServerName                                                [  OK  ]
9. Open a new terminal on the Host system and check what containers are running;

[centos@docker-vm ~]$ sudo docker ps -a

CONTAINER ID        IMAGE       COMMAND             CREATED             STATUS              PORTS               NAMES
bd93eb2b1ccf        e071bce628ba        "/bin/bash"         17 minutes ago      Up 17 minutes                           prickly_tesla
So, we have one running container from previous steps;

10. Detach and attach from/to an Docker container;


A. Detach from a container;

Press Ctrl-P + Ctrl-Q to detach from the container;

[root@docker-vm ~]# docker ps
CONTAINER ID        IMAGE               COMMAND             CREATED             STATUS              PORTS               NAMES
bd93eb2b1ccf        e071bce628ba        "/bin/bash"         24 minutes ago      Up 24 minutes                           prickly_tesla

B. Once detached, you can again connect to the running container. You need to provide the "CONTAINER ID" to attach to the reqd container;

[root@docker-vm ~]# docker attach bd93eb2b1ccf

[root@bd93eb2b1ccf /]#


11. Now, we will save our custom image with a different name [I named it as 
"centos6.9-httpd-bijit"]  with all our custom packages (remember we installed iproute, httpd, nmap etc)

Detach yourself [ctrl-p + ctrl-q] from the running container and save the container as new 
Docker image;

[root@docker-vm ~]# docker ps -a
CONTAINER ID        IMAGE          COMMAND         CREATED             STATUS              PORTS               NAMES
bd93eb2b1ccf        e071bce628ba        "/bin/bash"         36 minutes ago      Up 36 minutes prickly_tesla

[root@docker-vm ~]# docker commit bd93eb2b1ccf centos6.9-httpd-bijit


=================================
[root@docker-vm ~]# docker commit bd93eb2b1ccf centos6.9-httpd-bijit
dc988142a75d3f7d2308543223e987be89e31da7d6f579109f0f2bb4ee0c192a

[root@docker-vm ~]# docker images
REPOSITORY              TAG                 IMAGE ID            CREATED             VIRTUAL SIZE
centos6.9-httpd-bijit   latest              dc988142a75d        48 seconds ago      320.7 MB
centos                  6.9                 e071bce628ba        5 weeks ago         194.7 MB
=================================

12. Run a container using the newly built image;

[root@docker-vm ~]# docker run -it centos6.9-httpd-bijit /bin/bash

[root@29c8a4bd34d1 /]# service httpd start

So, we have successfully ran a container using our custom Docker image. 

13. Let's stop our container from previous step (ctrl+d from within container would do the job, [ docker stop also does that)

14. Now, we will Publish the container port (80 in our case) and map that to the Host OS, also provide a custom name for the container that we are going to start;


[root@docker-vm ~]# docker run -it -p 172.16.20.4:80:80 --name tux-container centos6.9-httpd-bijit /bin/bash

[root@a3923d777eaf /]#

[root@a3923d777eaf /]# service httpd start
Starting httpd: httpd: Could not reliably determine the server's fully qualified domain name, using 172.17.0.4 for ServerName


15. Now, try accessing Apache page using the Host IP address http://172.16.20.4/

[Remember our container IP is 172.17.0.4 while Host IP is 172.16.20.4 We are running HTTPD within the container and NOT on the Host systems]


============================================


List of basic commands;


============================================


Pushing an image to Docker Hub


A. Detach from an running Docker container and note down the container
id;

# docker ps
CONTAINER ID  IMAGE         COMMAND       CREATED       STATUS              PORTS               NAMES

3a8a3576695d  e071bce628ba  "/bin/bash"  11 minutes ago  Up 11 minutes                           tender_goldstine


B. Commit the changes using the following syntax;

docker commit /[:] to commit changes.

eg. in our case;


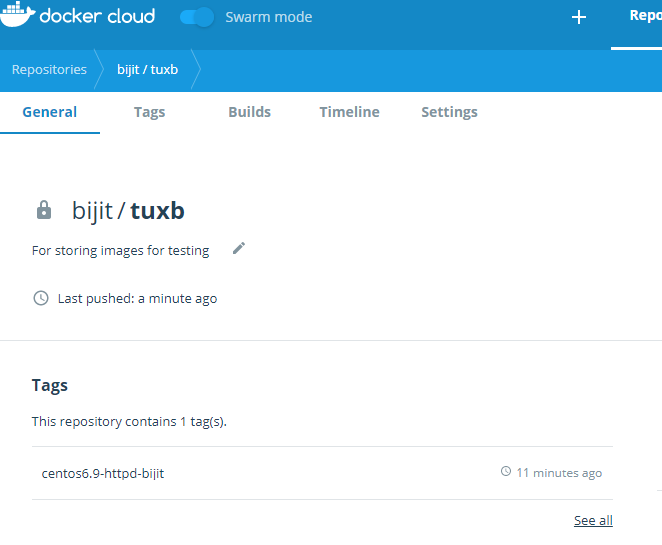
# docker commit 3a8a3576695d bijit/tuxb:centos6.9-httpd-bijit


4ff826f5c36ec9b6c452443ea1d759675456f53470fc30ea201b2be363e97627


C.    Now push this repository to the registry designated by its name or tag;

Syntax:  docker push /:


eg.  

====================
# docker push bijit/tuxb:centos6.9-httpd-bijit
The push refers to a repository [bijit/tuxb] (len: 1)
4ff826f5c36e: Image push failed

Please login prior to push:

Username: bijit
Password:
Email: xxxxxx@gmail.com
WARNING: login credentials saved in /root/.docker/config.json
Login Succeeded
The push refers to a repository [bijit/tuxb] (len: 1)
4ff826f5c36e: Image already exists
e071bce628ba: Image successfully pushed
f1070d829305: Image already exists
055b9989266a: Image successfully pushed

Digest: sha256:cce65ad4fc75b136f84b567ae3f281de2723115e13d21efa63660b36fbe53e42

====================


How to Pull the private Docker image?


1. Login to Docker Hub from command line.


docker login --username=yourhubusername --email=youremail@company.com


====================

[root@ins-2 ~]# docker login --username=bijit --email=xxxxx@gmail.com
Password:
WARNING: login credentials saved in /root/.docker/config.json
Login Succeeded
====================

2. Pull the image which was pushed to that private repository.

#docker pull bijit/tuxb:centos6.9-httpd-bijit


====================

[root@ins-2 ~]# docker pull bijit/tuxb:centos6.9-httpd-bijit
centos6.9-httpd-bijit: Pulling from bijit/tuxb
055b9989266a: Pull complete
f1070d829305: Pull complete
e071bce628ba: Pull complete
4ff826f5c36e: Already exists
Digest: sha256:cce65ad4fc75b136f84b567ae3f281de2723115e13d21efa63660b36fbe53e42
Status: Downloaded newer image for bijit/tuxb:centos6.9-httpd-bijit
====================

3. List the images available locally now;

# docker images

REPOSITORY          TAG                     IMAGE ID            CREATED             VIRTUAL SIZE
bijit/tuxb          centos6.9-httpd-bijit   4ff826f5c36e        10 hours ago        326.5 MB


4. Run a container using the image dowloaded from Private repository;


# docker run -it 4ff826f5c36e /bin/bash

[root@29c3296b8e48 /]#

["4ff826f5c36e" is the IMAGE ID ]


5. To stop the container either [ctrl+d] from within container or docker stop from Host

Friday, February 17, 2017

Replication Set in MongoDB – HowTo

Following write up describe how one can set up Replica Set in MongoDB (3x version). It is tested on CenOS-6x version. The same setup should work in any *nix based system. 

The IPs cited here are for example only.

A.  Participating Servers


1.   primary-ins   ========    172.16.20.3
2.   secondary-ins ========    172.16.20.4
3.   arbiter       ========     172.16.20.5

# cat /etc/centos-release
CentOS release 6.8 (Final)
    
     [On Openstack cloud platform]

B.   Host resolution (on all three servers)

     /etc/hosts
    
     172.16.20.3          primary-ins    
     172.16.20.4          secondary-ins  
     172.16.20.5          arbiter  

C.        Installed packages (On all three)

    
mongodb-org-shell-3.4.2-1.el6.x86_64
     mongodb-org-tools-3.4.2-1.el6.x86_64
     mongodb-org-server-3.4.2-1.el6.x86_64
     mongodb-org-mongos-3.4.2-1.el6.x86_64
     mongodb-org-3.4.2-1.el6.x86_64 
    

D.  Firewall considerations

* MongoDB listen on all interfaces instead of Loopback on all
  three hosts.
       [tcp 0  0 0.0.0.0:27017 0.0.0.0:*  LISTEN  22913/mongod]
    

     1. IPTABLES:

        Allowed entire subnet in Iptables INPUT chain for port 27017         (in all three hosts)
          
         # iptables -I INPUT -p tcp -s 172.16.20.0/24 --dport 27017 -j ACCEPT
         # service iptables save
         iptables: Saving firewall rules to /etc/sysconfig/iptables:[  OK  ]
         # service iptables restart
         iptables: Setting chains to policy ACCEPT: filter          [  OK  ]
         iptables: Flushing firewall rules:                         [  OK  ]
         iptables: Unloading modules:                               [  OK  ]
         iptables: Applying firewall rules:                         [  OK  ]
          
         # iptables -L | grep 27017
         ACCEPT     tcp  --  172.16.20.0/24   anywhere   tcp dpt:27017
              2.         SeLinux
          
           SeLinux changed from Enforcing to Permissive:
           # getenforce
            Enforcing
             
           #setenforce permissive

E.  Replication Setup (all three) /etc/mongod.conf

     replication:

       ## Replica Set name, consistent across all the systems
         replSetName: myRepSet

       ## Operation Log file size
         oplogSizeMB: 64

F.  Restart Mongo service (on all three, any order)

# service mongod restart 

G.  Initiate replica set

Connect to any Mongo Server and run rs.initiate() to initiate the new replica set (preferably connect to the one that would act as Primary):
    
# mongo
      
       > rs.initiate()
       {
"info2" : "no configuration specified. Using a default configuration for the set",
                     "me" : "primary-ins:27017",
                     "ok" : 1
       }
       myRepSet:OTHER>
    
    
     Note:
Once the initialization is done, the prompt would change to;
     myRepSet:PRIMARY>
    

H.  Add replica set members


Now, while on the Primary Server's prompt, add the other members (Secondary and the Arbiter) as follows;

     i.     Add seondary:
              myRepSet:PRIMARY> rs.add("secondary-ins:27017")
              { "ok" : 1 }

       ii.    Add arbiter
              myRepSet:PRIMARY> rs.addArb("arbiter:27017")
              { "ok" : 1 }

I.  Connect to other two Mongo servers and check the prompt(s):

     myRepSet:SECONDARY>
     myRepSet:ARBITER>

J.  Allow read from secondary members

Execute rs.slaveOk(). This is to allow you to read from secondary members (including the Arbiter);
    
myRepSet:SECONDARY> rs.slaveOk()
myRepSet:ARBITER> rs.slaveOk()

K.  Test

    Create a DB and insert a document to a collection on the primary
and check if it that has been replicated to the secondary;
    
     i.   Create DB and insert document on Primary Mongo server;
          
        myRepSet:PRIMARY> use test_replica
        switched to db test_replica
             
        myRepSet:PRIMARY> db.movie.insert({"name":"Jungle Book"})
        WriteResult({ "nInserted" : 1 })

     ii.  On the secondary Mongo server;
          
           myRepSet:SECONDARY> show dbs
           admin         0.000GB
           local         0.000GB
           test_replica  0.000GB
             
           myRepSet:SECONDARY> use test_replica
           switched to db test_replica
           myRepSet:SECONDARY> show collections
           movie
             
           myRepSet:SECONDARY> db.movie.find({})
           { "_id" : ObjectId("58963c37bede8f63243f5e52"), "name" : "Jungle Book" }
          
    
     iii. On Arbiter (Remember Arbiter does not take part in Data
replication, its only job is to elect member during a Failover)
          
myRepSet:ARBITER> show dbs
          admin  0.000GB
          local  0.000GB
               

L.   Check the configuration


myRepSet:PRIMARY> rs.conf()
{
        "_id" : "myRepSet",
        "version" : 3,
        "protocolVersion" : NumberLong(1),
        "members" : [
                {
                        "_id" : 0,
                        "host" : "primary-ins:27017",
                        "arbiterOnly" : false,
                        "buildIndexes" : true,
                        "hidden" : false,
                        "priority" : 1,
                        "tags" : {

                        },
                        "slaveDelay" : NumberLong(0),
                        "votes" : 1
                },
                {
                        "_id" : 1,
                        "host" : "secondary-ins:27017",
                        "arbiterOnly" : false,
                        "buildIndexes" : true,
                        "hidden" : false,
                        "priority" : 1,
                        "tags" : {

                        },
                        "slaveDelay" : NumberLong(0),
                        "votes" : 1
                },
                {
                        "_id" : 2,
                        "host" : "arbiter:27017",
                        "arbiterOnly" : true,
                        "buildIndexes" : true,
                        "hidden" : false,
                        "priority" : 1,
                        "tags" : {

                        },
                        "slaveDelay" : NumberLong(0),
                        "votes" : 1
                }
        ],
        "settings" : {
                "chainingAllowed" : true,
                "heartbeatIntervalMillis" : 2000,
                "heartbeatTimeoutSecs" : 10,
                "electionTimeoutMillis" : 10000,
                "catchUpTimeoutMillis" : 2000,
                "getLastErrorModes" : {

                },
                "getLastErrorDefaults" : {
                        "w" : 1,
                        "wtimeout" : 0
                },
                "replicaSetId" : ObjectId("589632c875b52533db9c7540")
        }

}

Thursday, June 23, 2016

Playing with Chmod!

What happens when you accidently change the permission of the all important ‘chmod’ command? 

Let’s try it out….


1.            # ls -l /bin/chmod
-rwxr-xr-x. 1 root root 48712 Oct 15  2014 /bin/chmod

2.   # rpm -qf `which chmod`
      coreutils-8.4-37.el6.x86_64
  
3.   chmod 444 /bin/chmod

4.   # ls -l /bin/chmod
-r--r--r--. 1 root root 48712 Oct 15  2014 /bin/chmod

So, the permission is changed!


5.   # chmod 655 /bin/chmod
  -bash: /bin/chmod: Permission denied

Oooops……Screwed  !!!!! :(

Now is the time to do some rescue stuff…

6. Lets restore it back;

7.   #    install -m 0755 /bin/chmod ./chmod.tmp
      #   ./chmod.tmp 0755 /bin/chmod

8.   # ls -l  /bin/chmod

 -rwxr-xr-x. 1 root root 48712 Oct 15  2014 /bin/chmod


Your all important 'chmod' command is back!

Linux just works ! ;)

Tuesday, December 22, 2015

Push your codes to GIT...

Want to save your codes? The opensource version control system GIT could be your choice.

The following lines describe how to to setup Git on a Centos 6x (should work on RHEL, Fedora and other Linux distributions as well).

(The public IP address was marked as ""xx")


1. Install Git on the server and the Client:
# yum install git -y

2. Created a system user "git" on the server.
# useradd git
# sudo su - git

3. Generate a SSH keypair for the user "git" to facilitate "git" over SSH:
$ ssh-keygen -t rsa
Generating public/private rsa key pair.
Enter file in which to save the key (/home/git/.ssh/id_rsa):
Created directory '/home/git/.ssh'.
Enter passphrase (empty for no passphrase):
Enter same passphrase again:
Your identification has been saved in /home/git/.ssh/id_rsa.
Your public key has been saved in /home/git/.ssh/id_rsa.pub.
The key fingerprint is:
8a:18:fd:72:37:c2:f9:a0:28:8a:f6:7d:51:98:56:a9 git@ins-1
The key's randomart image is:
+--[ RSA 2048]----+
|          .      |
|         o       |
|        =        |
|   .   E .       |
|  . . . S        |
|   o + +         |
|  . o O +        |
|o. ..+ * .       |
|=.o.... .        |
+-----------------+

4. Copy the contents of the Public SSH key to the authorized_key file for the
         user "git":
$ cat /home/git/.ssh/id_rsa.pub > /home/git/.ssh/authorized_keys

5. Copy the private SSH key to the local system (client) and store it in a file
        under some directory; we would be using this key to connect with Git server         (using "git" user).

6. On the server and the client change the permission of the authorized_key
         and the private key to (0600), else it will complain while making SSH  
         connection;

A. Server:
chmod 0600 /home/git/.ssh/authorized_keys

B. Client:
# chmod 0600 id-rsa-private

7. Test a normal SSH connection from the client;
$ ssh -i id-rsa-private git@xxx.xxx.xx.xx
[git@ins-1 ~]$

So, the SSH connection is working!

8. Store the ssh private key in the Keychain so that you don't need to specify it
        every time while making the SSH connection;

$ eval $(ssh-agent -s)
Agent pid 97010

$ ssh-add id-rsa-private
Identity added: id-rsa-private (id-rsa-private)


9. Create an empty Repository on the server:

        A. Created a Project Directory:

$ mkdir Projects
$ cd Projects/

B. Under Project directory, created one emppty repository:

        $ git init --bare project-1.git
Initialized empty Git repository in /home/git/Projects/project-1.git/

10. On the client let us clone this repository first;

A. Create a Local directory (if you wish)
$ mkdir Project-1-Local
$ cd Project-1-Local/

B. Set up and initialize the new repository on the client:

$ git init && git remote add origin
                   git@xxx.xxx.xx.xx:/home/git/Projects/project-1.git/
Initialized empty Git repository in /home/bijit/GIT-User/Project-1-
                Local/.git/

This will set up the GIT environment locally, check using ls -al
***********************
$ ls -al
total 12
drwxrwxr-x. 3 bijit bijit 4096 Dec  9 13:43 .
drwxrwxr-x. 4 bijit bijit 4096 Dec  9 13:26 ..
drwxrwxr-x. 7 bijit bijit 4096 Dec  9 13:43 .git
***********************

**** For cloning the remote repo locally;
$ git clone git@xxx.xxx.x.x:/home/git/Projects/project-1.git
======================================
eg.
$ git clone git@192.168.1.4:/home/git/Projects/project-1.git Initialized empty Git repository in /home/centos/myProjects-Local/project-1/.git/ warning: You appear to have cloned an empty repository.
======================================

C. Do a git config to see the configurations:

$ cd project-1/

$ git config -l
core.repositoryformatversion=0
core.filemode=true
core.bare=false
core.logallrefupdates=true
remote.origin.url=git@xxx.xxx.xx.xx:/home/git/Projects/project-1.git/
remote.origin.fetch=+refs/heads/*:refs/remotes/origin/*

GIT PUSH:

11. Now, on the client create some test files and directories and push it to the
        GIT server:

A.
$ pwd
/home/bijit/GIT-User/Project-1-Local

B. Create contents:

$ mkdir Test-Dir-1
$ echo "Test content" > test-file-1.txt

C. Add and Commit Locally:

$ git add .

$ git commit -m "Test commit 1"
[master (root-commit) 35aa811] Test commit 1
Committer: Bijit Bhattacharjee
Your name and email address were configured automatically based
on your username and hostname. Please check that they are accurate.
You can suppress this message by setting them explicitly:

git config --global user.name "Your Name"
git config --global user.email you@example.com

After doing this, you may fix the identity used for this commit with:

git commit --amend --reset-author

1 file changed, 1 insertion(+)
create mode 100644 test-file-1.txt


D. Push the contents to Remote GIT server:
$ git push origin master
Counting objects: 3, done.
Writing objects: 100% (3/3), 242 bytes | 0 bytes/s, done.
Total 3 (delta 0), reused 0 (delta 0)
To git@xxx.xxx.xx.xx:/home/git/Projects/project-1.git/
* [new branch]      master -> master


GIT PULL:

1. Make a test directory and pull the contents from the remote Git Repo:

$ mkdir Test-Checkout-P1
$ cd Test-Checkout-P1/

2.     Initialize the directory:
$ git init && git remote add origin
           git@xxx.xxx.xx.xx:/home/git/Projects/project-1.git/
Initialized empty Git repository in /home/bijit/GIT-User/Test-Checkout-
        P1/.git/

3. Now, pull the contents:
$ git pull origin master
From xxx.xxx.xx.xx:/home/git/Projects/project-1
* branch            master     -> FETCH_HEAD
[bijit@localhost Test-Checkout-P1]$ ll
total 8
-rw-rw-r--. 1 bijit bijit  6 Dec  9 15:50 file-2.txt
-rw-rw-r--. 1 bijit bijit 13 Dec  9 15:50 test-file-1.txt

Note:  Did not pull the empty directory (Test-Dir-1) initially, but when that Directory was pushed with a file (file-1.txt). Subsequent pulls were able to bring down the Directory with its contents.


A. Create one branch locally say "bash", write a test script and Push the branch to remote repository; 

1. $ pwd
/home/centos/myProjects-Local/project-1

2. Check all branches once
$ git branch -a
* master
remotes/origin/master

2. git branch bash

3. Switch to local branch "bash"
$ git checkout bash
Switched to branch 'bash'

4. Create a script and change permission;
$ vi hello.sh
$ chmod u+x hello.sh

5. Add the file locally;

$ git add hello.sh
$ git status
# On branch bash
# Changes to be committed:
#   (use "git reset HEAD ..." to unstage)
#
#       new file:   hello.sh
#

6. git commit -m "Added a script to new branch"

7. Push the branch;
$ git push origin bash
Counting objects: 4, done.
Compressing objects: 100% (2/2), done.
Writing objects: 100% (3/3), 345 bytes, done.
Total 3 (delta 0), reused 0 (delta 0)
To git@192.168.1.4:/home/git/Projects/project-1.git
* [new branch]      bash -> bash

B. Checkout the remote branch and merge that branch to master;

1. Check local branch;
$ git branch -l
* bash
 master

2. $ git checkout master

$ git checkout master
Switched to branch 'master'

3. $ git pull origin master
===================
$ git pull origin master
From 192.168.1.4:/home/git/Projects/project-1
* branch            master     -> FETCH_HEAD
Already up-to-date.
====================

4. Merge the branch eg. our branch is "bash"
$ git merge bash
=========================
$ git merge bash
Updating 2420bef..f8d2345
Fast-forward
hello.sh |    5 +++++
1 files changed, 5 insertions(+), 0 deletions(-)
create mode 100755 hello.sh
==========================
 5. Push the changes;
$ git push origin master
===============================
$ git push origin master
Total 0 (delta 0), reused 0 (delta 0)
To git@192.168.1.4:/home/git/Projects/project-1.git
2420bef..f8d2345  master -> master
===============================


Accessing BitBucket using SSH keys, How-To

1. On the client system generate a ssh keypair to be used for git;

# ssh-keygen -t rsa
Generating public/private rsa key pair.
Enter file in which to save the key (/root/.ssh/id_rsa): /opt/bijit/others/.ssh-keys/bijit_bb
Enter passphrase (empty for no passphrase):
Enter same passphrase again:
Your identification has been saved in /opt/bijit/others/.ssh-keys/bijit_bb.
Your public key has been saved in /opt/bijit/others/.ssh-keys/bijit_bb.pub.
The key fingerprint is:
ba:76:aa:d4:82:ca:32:fa:33:d1:c4:22:ea:81:d0:b0 root@ip-172-16-20-101
The key's randomart image is:
+--[ RSA 2048]----+
|                 |
|.                |
| + .             |
|E o o            |
|+. +    S        |
|o..... .         |
|. o.o o          |
|+oo. ....        |
|=+.o.ooo         |
+-----------------+

2. Copy the contents of the public key (.eg bijit_bb.pub), and paste it in BitBucket project
        under deployment keys section. [Thus, your key would now be identified]

# cat bijit_bb.pub
ssh-rsa  
         AAAAB3NzaC1yc2EAAAADAQABAAABAQDa4dHa3f51tl0H4Ye86qHxp4o6
         VgRwhOIn4JZIArFMKwy9k5DqHFyKh38rvtM7weO2OUkgMZIyDMZL5LM67
         wj+Wem1Baa4aF/DsV69Ns6deB7kGkGPg0HEbU8RrPTZkOaNdt8XjpADhjhkjhjk
         hhj7CS5i6CXF02LJpe4ol6E0vbDyc6eufuUWlCTSqPf6FOaD+CGVaDuv9aCOEP10imt
         O5t3e0BaD80jDi58mbZl7ZuNdDOOTP/N4JNGcEpAkooc7/9LaSnrc87eHI04Fah/7
         i3dbu5DFG73dMCrRve3hOJuqwsvi80VU3vXiSGOpSjLQLrACKpmQK004Qdy
         oUIqcv root@ip-172-16-20-101

3. On the client system, clone the project repo;
# git clone https://bijit@bitbucket.org/project-dir/project-repo-name.git

4.     Add the ssh private key that you have geerated earlier (in either of the following two methods)
        # ssh-agent bash -c 'ssh-add /opt/bijit/others/.ssh-keys/bijit_bb; cd /opt/bijit/others/repos/project-
           name; git pull'

Or,

# eval $(ssh-agent -s)
 Agent pid 3463

# ssh-add /opt/bijit/others/.ssh-keys/bijit_bb
Enter passphrase for /opt/bijit/others/.ssh-keys/bijit_bb:
         Identity added: /opt/bijit/others/.ssh-keys/bijit_bb (/opt/bijit/others/.ssh-keys/bijit_bb)

# cd /opt/bijit/others/repos/project-name/
# git pull
 Already up-to-date.